Welcome to Websheet Editor
The most intuitive way to edit your Websheet.
Add and edit blocks, switch pages, adjust site settings, toggle viewports, and save all of your changes.
Rename Pages
You can change the page title in Websheet Editor and also the name shown in the tab of your browser.

  1. Click the Tutorial Page selector located to the right of the Block Library button
  2. Select Rename Page
  3. Change Name and Title to “My first Websheet”
  4. Save your changes and close the Page Properties after the page updates
Now it's your page.
Block Controls
Find the Block Controls in the top left corner when hovering on the block. Use it to move, add, copy, or delete blocks.
 
  1. Copy this block
  2. Delete the original block
Add a Block
Add a block using the Block Library located in the top left corner of the Websheet Editor window. If you want to add a new block directly below this block, use Block Controls.
 
  1. Click the “+” icon in Block Controls or use the “+” icon located in the bottom center of the block
  2. Select Text in the Block Library
  3. Click to TITLE01
Block Editor
The Block Editor allows you to quickly edit the style of your Block.
 
Each Block is split into different Elements, containing various settings to edit.
 
In Block Settings, you can set up a global setting for the whole block.
Change TEXT
Change bottom text to "Hello, World!"
 
  1. Click on the yellow text below
  2. Change the text to “Hello, World!” using the Text Editor
  3. Click Done
*Change this yellow text and click the “Done” button located at the bottom right corner of the Block Editor*
Block Settings
Adjust the block settings: Top Padding, Bottom Padding, and Widths (Advanced).

  1. Click on the Block
  2. Click on SETTINGS
  3. Click Paddings and adjust the top or bottom padding; for example, set up 15px for the Top Padding and 120px for the Bottom Padding
  4.  Click the ADVANCED tab to adjust more advanced settings: Sections Widths or Max Width
Change IMAGE
Upload a selfie or another photo, for example, some puppies or cats.
 
  1. Click the image on the right
  2. Use the Replace button to replace the filler image with your own
  3. Use Upload to create a slider with multiple images

Link a BUTTON
Add a link for the Button. You can connect a Webseet page or paste any URL, email, or phone number.
 
  1. Click the Button below
  2. Clik on the Select Page button to select one of the Websheet pages
  3. Click on the Tutorial Page ("My First Page") to select this page
  4. Click on the IMG01 row and confirm with the OK button
Now your button is connected to the beginning of this page. If the client clicks on the Button, he will see the first block.
Connecting the Spreadsheet
The main feature of Websheet is to sync your spreadsheet and website.
 
You can use Google Sheets as a powerful CMS for your website.
 
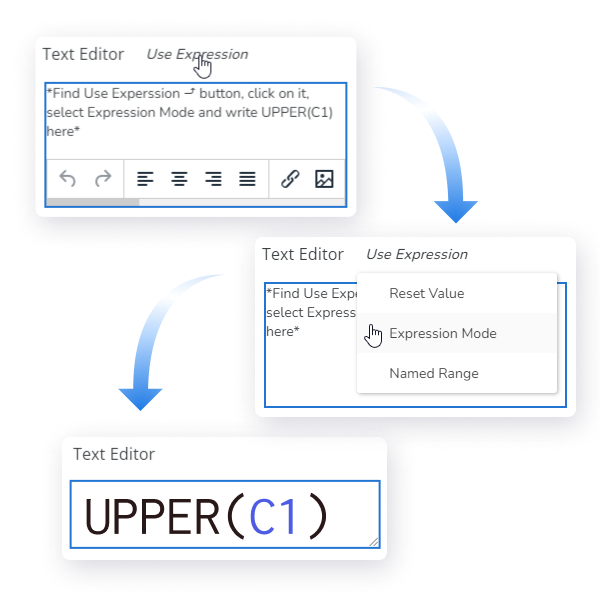
Websheet allows you to update texts, photos, files, charts, and use Google formulas to make it more powerful.
Connect CELLS to the Sheet Range
Learn how to display the same Table from your spreadsheet inside your page with Websheet.
 
  1. Click on the table icon on the right
  2. Select “Demo Data” in the Select Sheet selector

If you make additional changes in the spreadsheet, the block will be updated.

Table is missing
Connect a Chart
Incorporate Google Sheets charts in your website to help visualize your data.
 
  1. Click the chart icon on the right
  2. Choose “ Demo Data - ...” in the Chart selector
Chart is missing
Expression Mode & Select Page
Learn how to create an interactive Table with an optional Filter to browse your data.
 
For some fields, connect the range instead of the cell. For example, the entire page from your spreadsheet.

  1. Click a table icon on the right
  2. Hover the Table input
  3. Click Use Expression
  4. Choose Select Sheet
  5. Select the “Demo Data”

Now your table is connected with the Demo Data sheet in the spreadsheet.

Table is missing
Working With LIST Items
With LIST, you can change the style of all of the list’s items at once and update the data separately for each item. Also, it makes it easy to connect the data from your spreadsheet.
 
  1. Click on the Block
  2. Click LIST in the Block Editor 
  3. Hover over the Items text and click on Use Expression
  4. Click Create New Sheet (or Select Sheet if you prefer connecting it to existing data)

Now you have a sheet connected with the Block. Any change in the sheet will be reflected in the Block

Expression Mode
Connect any Block Option with your spreadsheet data by using Expression Mode. When you update data in the spreadsheet, it will automatically update the Block Option connected to the spreadsheet cell or range.
 
  1. Click the yellow text below
  2. Hover over the Text Editor
  3. Click Use Expression
  4. Select the Expression Mode
  5. Write “UPPER(C1)” in the Expression Editor
  6. Click Apply and then click OK in the dialogue menu
Look at the text. Now it's the same as the text in the C1 cell but in upper case because of the UPPER formula.
*Find the Use Expression ⤴ button, click on it, select the Expression Mode and write “UPPER(C1)” here*
Site Settings
Set up the global settings for the entire website and change default fonts, colors, paddings, and the set-up menu.
 
To keep the website consistent, use the Default values in the Block Editor and adjust the global values in Site Settings to match your preferences.
 
You can also make your website multilingual in Site Settings.
Fonts Settings
Set up Fonts for titles, regular texts, and buttons.
 
  1. Click the Site Settings button on the top right corner of the Websheet Editor window
  2. Choose the Fonts tab
  3. Set Montserrat font as the Headline and Text Font Family
  4. Save the changes
Color Settings
Change the default colors for texts, links, and backgrounds.
 
  1. Click the Site Settings button on the top right corner of the Websheet Editor window
  2. Choose the Colors tab
  3. Set black (#000) as the color for the Background
  4. Save the changes

Now you can see the global background color as the background of all of the blocks.

Let's see your work
Websheet update your website with each  change in speadsheet. To save your changes to spreadheet use the Save button.
 
  1. Click to the Save button in top right angle of Websheet Editor window
  2. Click to the Page Selector on the right of Block Library button
  3. Click to the View Page button
Now you have a real website, you can even share a link with your friend. Any change in your spreadsheet, will be visible on the page by visiting the page from websheet or after 30s second visit not from websheet.
Congrats!
Now you are a Websheet Expert! (Almost)